FAQ
->
WiFi / Eduroam
->
Eduroam (easyroam)
Windows
This manual only serves as a supplement to the official documentation of the DFN and may contain minor additions to it.
You will find the most up-to-date instructions at https://doku.tid.dfn.de/en:eduroam:easyroam
Setup with easyroam app
Please ensure that you have at least app version 1.4.6 installed! Profiles from older program versions may stop working. If you already have an older version installed, you should reinstall the app according to the following steps.
- Open easyroam.de in your web browser
- Select “Hochschule Bonn-Rhein-Sieg IDM” from the list and log in with your MIA account details
- Download the Windows Installer and install the app
- Open easyroam via the App Launcher.
- Press “Login”
- In the browser window that opens, select “Hochschule Bonn-Rhein-Sieg IDM” and log in with your MIA account details
- Click “Install new profile” in the app
- Confirm the installation
- The profile should then be installed, and you can select “eduroam” from the Wi-Fi settings and connect to it
If the setup with the easyroam app fails
These instructions only apply to Windows 11! Older versions of Windows are no longer supported.
- Open easyroam.de in your web browser
- Select “Hochschule Bonn-Rhein-Sieg IDM” from the list and log in with your MIA account details
- Under “Manual Installation”, select “Windows”
- Set a name for the profile and press OK to start downloading the .p12 file
- Install the downloaded .p12 file (you do not need to enter a password or change any of the default settings)
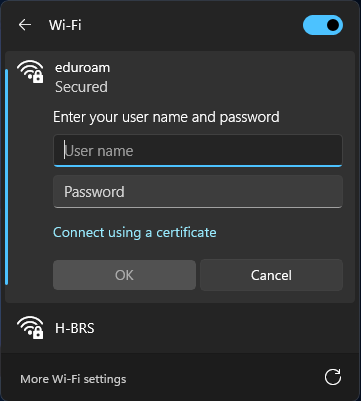
- Now select the “eduroam” SSID in the connection menu
- Click on “Connect using a certificate” below the input fields
- If this option does not appear, the .p12 file has not been installed correctly! In this case, please repeat the previous steps
- After reconfirming, the connection will be established automatically
Each profile is valid for six months. Please note this validity period and renew it in good time according to these instructions!
- Profiles can be viewed using the Windows program “Manage User Certificates (certmgr)” under “My Certificates > Certificates” and deleted after they expire
- If multiple profiles are installed, the correct one must be selected from a drop-down list when attempting to connect for the first time
- To do this, compare the certificate number with the profile on the easyroam website under “Profiles” or simply delete all old profiles